
1 Introduction
The Balboa VL801D control panel is designed for VS and GS systems in the 500DZ series (from 500DZ to 520DZ). This panel features a segmented LCD display that shows water temperature, operating modes, and diagnostic messages.
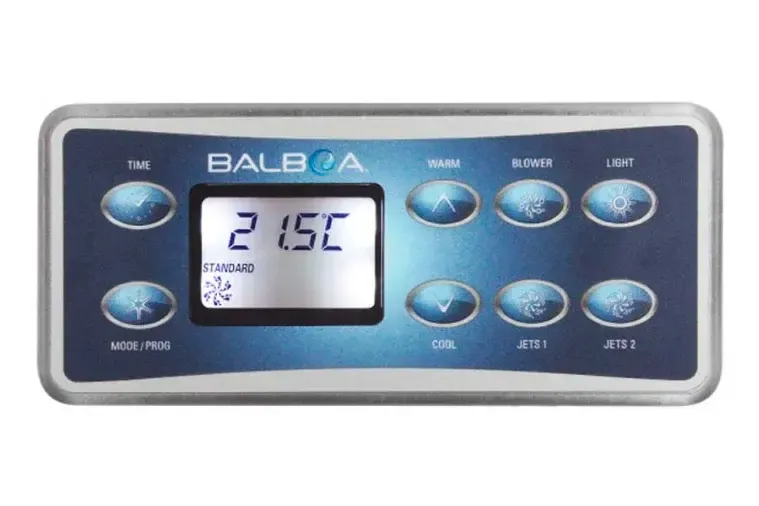
The VL801D panel has 7 buttons for complete hot tub control:
| Button | Function |
|---|---|
| Warm | Increases set temperature |
| Cool | Decreases set temperature |
| Mode/Prog | Changes operating mode and filtration schedule |
| Time | Sets the time |
| Jets | Activates/deactivates massage pumps |
| Blower | Activates/deactivates air blower (if equipped) |
| Light | Turns light on/off |
1.1 Display Icons
The LCD display shows various icons to indicate operating status:
| Icon | Meaning |
|---|---|
| STANDARD | Standard mode active |
| ECONOMY | Economy mode active |
| SET HEAT | Target temperature set |
| Eco | Temperature not updated in Economy mode |
| SLP | Temperature not updated in Sleep mode |
1.2 Temperature Range
The VL801D panel allows setting the water temperature within the following range:
- Minimum: 80°F (26.0°C)
- Maximum: 104°F (40.0°C)
NOTE: The temperature displayed is only updated when the pump has been running for at least 2 minutes.
2 Initialization Message (Priming Mode)
When the hot tub is powered on for the first time, the system automatically enters Priming Mode. The "Pr" symbol appears on the display.
2.1 Priming Procedure
- Verify that the display shows "Pr" (Priming Mode)
- Press the "Jets" button repeatedly to activate all pumps
- Ensure all pumps are free of air
- Priming Mode lasts less than 5 minutes
- Press "Warm" or "Cool" to manually exit Priming Mode
WARNING: During Priming Mode, verify that all pumps are operating correctly and have no air bubbles. Incomplete priming can cause heating malfunctions.
After Priming Mode, the hot tub will automatically operate in Standard mode.
3 Setting the Time
On first startup, the display flashes "SET TIME". To set the time:
- Press the "Time" button
- Press the "Mode/Prog" button
- Press "Warm" or "Cool" to scroll through the time
- When the desired time is displayed, press "Warm" or "Cool" again to stop scrolling
- Press "Time" to confirm the setting
NOTE: In multi-button sequences, if buttons are pressed too quickly they may not register. Wait a moment between presses.
4 Setting Temperature Range
To view and modify the set temperature:
4.1 View Set Temperature
- Press "Warm" or "Cool" once
- The display shows the flashing target temperature
4.2 Modify Temperature
- Press "Warm" or "Cool" to display the set temperature
- Before the display stops flashing, press "Warm" again to increase or "Cool" to decrease
- After 3 seconds of inactivity, the display stops flashing and returns to showing the current temperature
NOTE: The displayed temperature is only updated after the pump has been running for at least 2 minutes.
5 Modes (Standard/Economy/Sleep)
The VL801D panel offers three operating modes to manage water heating. To change modes, first press "Warm" or "Cool", then press "Mode/Prog".
5.1 Standard Mode
In Standard mode, the hot tub constantly maintains the set temperature. The "STANDARD" icon appears on the display.
- The heater activates whenever the temperature drops below the set value
- The hot tub is always ready for use
- Higher energy consumption
5.2 Economy Mode
In Economy mode, the hot tub heats the water to the set temperature only during filtration cycles. The "ECONOMY" icon appears on the display.
- "Eco" appears when the temperature is not updated
- "Eco" alternates with the temperature when the pump is running
- Energy savings compared to Standard mode
5.3 Sleep Mode
In Sleep mode, the hot tub maintains the temperature at 20°F (10°C) below the set temperature, heating only during filtration cycles.
- "SLP" appears when the temperature is not updated
- "SLP" alternates with the current temperature when the pump is running
- Maximum energy savings
- Ideal for extended periods of non-use
6 Filtration Settings (Presets + FLTR1 and 2)
6.1 Preset Filtration Cycles
The system has two preset filtration cycles:
| Cycle | Start Time | End Time | Duration |
|---|---|---|---|
| Filtration 1 | 8:00 AM | 10:00 AM | 2 hours |
| Filtration 2 | 8:00 PM | 10:00 PM | 2 hours |
6.2 Behavior During Filtration
System behavior during filtration varies based on configuration:
Systems without circulation pump (non-circ):
- Pump 1 at low speed and ozone generator (if installed) operate during filtration
Systems with 24-hour circulation:
- The circulation pump and ozone generator operate 24 hours a day
- In warm environments, the circulation pump may turn off for 30-minute periods, except during filtration cycles
Systems with non-24-hour circulation:
- The circulation pump and ozone generator operate during filtration
- They may also activate automatically at other times
NOTE: At the start of each filtration cycle, all other devices briefly activate to purge the plumbing.
6.3 Programming Filtration Cycles (FLTR1 and FLTR2)
It is not mandatory to modify filtration cycles, but if you wish to customize them:
- Press "Time", then "Mode/Prog", then "Mode/Prog" again within 3 seconds
- "SET START FILTER 1 (AM)" appears
- Press "Warm" or "Cool" to set the start time of the first cycle
- Press "Mode/Prog" to move to "SET STOP FILTER 1"
- Adjust the end time with "Warm" or "Cool"
- Press "Mode/Prog" to move to "SET START FILTER 2 (PM)"
- Adjust the start time of the second cycle
- Press "Mode/Prog" to move to "SET STOP FILTER 2"
- Adjust the end time
- Press "Mode/Prog" to confirm all settings
7 Panel Lock and Unlock
7.1 Full Panel Lock
To lock all panel buttons:
- Press "Time", "Blower", and "Warm" within 3 seconds
- The panel is now locked
To unlock the panel:
- Press "Time", "Blower", and "Cool" within 2 seconds
7.2 Temperature Lock Only
To disable only the temperature adjustment buttons:
- Press "Warm", "Time", "Blower", and "Warm" within 3 seconds
- The "Warm" and "Cool" buttons are now disabled
To unlock temperature:
- Press "Time", "Blower", and "Cool" within 2 seconds
NOTE: On some systems, the "Jets 1" button is used instead of "Blower" in lock/unlock sequences.
8 Error Messages and Diagnostics
This section describes all diagnostic messages that can appear on the VL801D panel LCD display. Understanding these messages allows you to quickly identify any issues and take appropriate action.
WARNING: In case of persistent error messages or if you are unsure about what action to take, contact a qualified technician. Do not attempt electrical or plumbing repairs without the necessary expertise.
8.1 General Status Messages
8.1.1 Display Off - No Message
If the display shows no message, it means electrical power has been interrupted to the hot tub.
What happens:
- The control panel will be disabled until power is restored
- All hot tub settings (temperature, mode, filtration cycles) will be preserved in memory
- Settings will be automatically restored at the next power-up
What to do:
- Verify that the main switch is in the ON position
- Check the electrical panel for any tripped breakers
- Verify that the GFCI/RCD has not tripped
- If the problem persists, contact a qualified electrician
8.1.2 - - (Dashes) - Unknown Temperature
This message indicates that the system has not yet detected the water temperature. It is normal to see this message immediately after power-up or after a period of pump inactivity.
What to do:
- Wait for the pump to run for at least 2 minutes
- After this period, the current temperature will be displayed automatically
- If dashes persist even with the pump running, there may be a sensor issue
NOTE: The temperature displayed is only updated and reliable when the pump has been running for at least 2 minutes.
8.2 Overheat Messages
8.2.1 OHH - Heater Overheat
This message indicates that one of the temperature sensors has detected 118°F (47.8°C) at the heater. The hot tub has automatically shut down for safety.
DANGER: DO NOT ENTER THE WATER when this message appears. Such high temperatures can cause severe burns, hyperthermia, and other potentially fatal health problems.
Possible causes:
- Insufficient water flow through the heater
- Clogged filter reducing circulation
- Partially closed valves
- Pump not properly primed
- Thermostat or sensor malfunction
What to do:
- Do not enter the water under any circumstances
- Remove the hot tub cover to allow cooling
- Wait for the heater to cool down
- Once cooled, press any button to reset the error
- If the hot tub does not reset, turn off the main power
- Contact your dealer or technical support
8.2.2 OHS - Water Overheat
This message indicates that one of the sensors has detected that the hot tub water temperature has reached 110°F (43.5°C). The hot tub has automatically shut down.
DANGER: DO NOT ENTER THE WATER when this message appears. Temperatures above 40°C can cause hyperthermia, heat stroke, and other serious health problems.
Difference from OHH: While OHH indicates overheating of the heater itself, OHS indicates that the water in the tub is too hot. OHS can be caused by environmental conditions or prolonged use.
What to do:
- Do not enter the water
- Remove the hot tub cover to accelerate cooling
- Wait for the temperature to drop
- At 107°F (41.7°C), the hot tub should reset automatically
- If it does not reset automatically, turn off the power and contact support
Prevention:
- Do not set temperatures too high
- Ensure the cover does not retain too much heat in warm environments
- Regularly check the set temperature
8.3 Sensor-Related Messages
8.3.1 SnA - Sensor A Failure
This message indicates that the sensor connected to the "Sensor A" jack is not functioning properly. The hot tub has been shut down for safety.
WARNING: Without a functioning sensor, the system cannot properly monitor temperature, which can be dangerous.
What to do:
- Contact your dealer or technical support
- The sensor will need to be checked and probably replaced
- Do not attempt to repair or replace the sensor yourself if not qualified
NOTE: This message may appear temporarily during an overheat condition. If it appears briefly and then disappears, it may not indicate a permanent failure.
8.3.2 Snb - Sensor B Failure
This message indicates that the sensor connected to the "Sensor B" jack is not functioning properly. The hot tub has been shut down for safety.
What to do:
- Contact your dealer or technical support for verification and replacement
- As with SnA, this message may appear temporarily during overheat conditions
8.3.3 SnS - Sensors Unbalanced
This message indicates that the two temperature sensors in the system are showing significantly different readings from each other.
Message behavior:
- If the message alternates with the hot tub temperature, it may be a temporary condition
- If the message flashes alone without showing the temperature, the hot tub has been shut down
Possible causes:
- A sensor is beginning to degrade
- Connection problems with a sensor
- Air trapped near a sensor
- Temporary condition during rapid temperature changes
What to do:
- Observe whether the message is persistent or intermittent
- If it alternates with the temperature, monitor the situation
- If it flashes alone, the hot tub is shut down and requires intervention
- If the problem persists, contact your dealer or technical support
8.4 Water Flow Related Messages
8.4.1 HFL - Flow Problem Detected
This message indicates that a significant difference has been detected between the temperature sensor readings. This can indicate a water flow problem in the system.
Possible causes:
- Water level too low
- Pumps not properly primed
- Partially clogged filter
- Obstructions in the plumbing
- Partially closed valves
- Air in the system
What to do:
- Verify that the water level is adequate
- Check that all pumps have been properly primed
- Check and clean the filter if necessary
- Ensure all valves are fully open
- If the problem persists, contact technical support
8.4.2 LF - Persistent Flow Problems
This message appears on the fifth occurrence of the HFL message within 24 hours. It indicates a recurring flow problem that requires attention.
Characteristics:
- The heater is shut down for safety
- Other hot tub functions (pumps, lights, etc.) continue to operate normally
- Heating capability does not reset automatically
What to do:
- Perform all the checks indicated for the HFL message
- Press any button to reset the error and reactivate heating
- If the problem recurs frequently, it is necessary to identify and resolve the underlying cause
- Contact technical support for a thorough diagnosis
8.4.3 dr - Possible Dry Heater
This message indicates a possible condition of insufficient water, poor flow, or air bubbles detected in the heater. The hot tub has shut down for 15 minutes as a precautionary measure.
WARNING: Dry operation of the heater can cause permanent damage to components.
Characteristics:
- The hot tub remains off for 15 minutes
- The message will reset automatically after 15 minutes
- Manual reset is possible by pressing a button
What to do:
- Verify that the water level is adequate
- Check that all pumps have been properly primed
- Verify that there are no visible leaks
- Wait the 15 minutes or press a button to reset
- If the problem persists, contact technical support
8.4.4 dry - Dry Heater Confirmed
This message appears on the third occurrence of the "dr" message. It indicates that the system has repeatedly detected insufficient water in the heater. The hot tub has been shut down for safety.
DANGER: This is a serious message indicating a persistent problem that must be resolved before continuing to use the hot tub.
Characteristics:
- The hot tub is completely shut down
- The system does NOT reset automatically
- Manual reset is required after resolving the problem
What to do:
- Immediately verify the water level
- Check for any leaks in the system
- Ensure all pumps are properly primed
- Verify that valves are open and the filter is not clogged
- Only after resolving the problem, press a button to manually reset
- If the message reappears, contact technical support before continuing use
8.5 Freeze Protection
8.5.1 ICE - Potential Freeze Condition
This message indicates that the system has detected a potential freeze condition and has automatically activated freeze protection.
How freeze protection works:
- All water devices activate automatically regardless of hot tub status
- Pumps circulate water to prevent freezing
- The heater may activate to raise the temperature
- Devices remain active for 4 minutes after sensors detect the temperature has risen above 45°F (7.2°C)
NOTE: This is an automatic safety system. No user action is required.
What to do:
- No action is required - the system automatically manages protection
- Verify that the cover is properly positioned to reduce heat loss
- In very cold climates, consider installing an auxiliary freeze sensor for additional protection
WARNING: Even when the hot tub is shut down due to an error, devices may still activate if freeze protection is needed. This is normal safety behavior.
NOTE: An optional auxiliary freeze sensor can be added for protection against extraordinary freeze conditions. Auxiliary sensor protection is advisable in colder climates. Consult your dealer for installation details.
8.6 Device Control
The VL801D panel allows control of the following devices:
| Device | Command | Auto Shutoff |
|---|---|---|
| Jets 1 (Pump 1) | Press "Jets" for on/off and speed change | Low speed: 4 hours / High speed: 15 minutes |
| Jets 2/Jets 3 | Press the corresponding button | 15 minutes |
| Blower | Press "Blower" | 15 minutes |
| Light | Press "Light" | 4 hours |
NOTE: The low-speed pump may activate automatically for filtration and heating. During these periods it cannot be deactivated from the panel, but high speed can be activated.
WARNING: Electric shock hazard. The system contains no user-serviceable parts. Do not attempt to repair the control system. Contact your dealer or technical support. Installation must be performed by a qualified electrician and all grounding connections must be properly installed.