1 Introduction
The TP500 Series panel is a touchpad control system compatible with all Balboa Water Group BP Series systems. It offers an intuitive interface with LCD display for complete hot tub management.
1.1 Buttons
The panel features 6 buttons arranged horizontally below the LCD display.
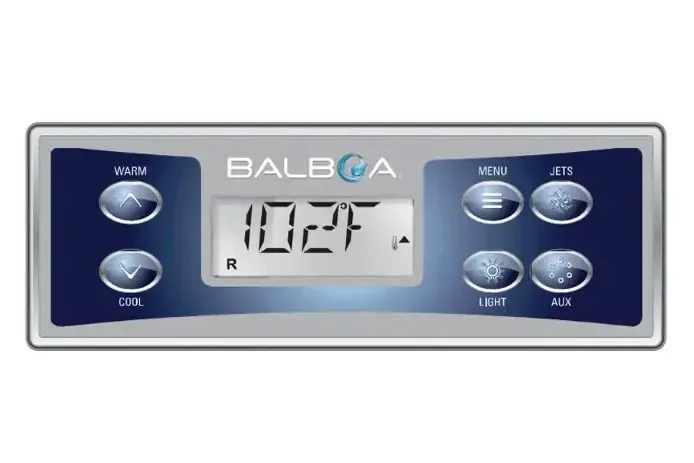
| Button | Main Function | Long Press |
|---|---|---|
| WARM | Increases set temperature | Rapid increment |
| COOL | Decreases set temperature | Rapid decrement |
| MENU | Accesses main menu | Returns to main screen |
| JETS | Activates/deactivates jet pumps | Changes pump speed |
| LIGHT | Turns lighting on/off | Changes color/light mode |
| AUX | Controls auxiliary devices | Secondary functions |
1.2 Display Symbols and Icons
The LCD display shows various icons to indicate the system operating status.
| Icon | Symbol | Meaning |
|---|---|---|
| A | Flame | Heating active |
| B | Ready | Ready mode active |
| C | Rest | Rest mode active |
| D | bba2 | bba system connected |
| E | WiFi | WiFi module active |
| F | Light bulb | Lighting on |
| G | Cleanup | Cleanup cycle in progress |
| H | Jets 1 | Jets 1 pump active |
| I | Jets 2 | Jets 2 pump active |
| J | Blower | Air blower active |
| K | Auxiliary | Auxiliary device active |
| L | Hi/Low | Temperature range (Hi/Lo) |
| M | Set | Set temperature |
| N | Filter | Filtration cycle in progress |
| O | AM/PM | 12-hour time indicator |
2 Initialization Message (Priming Mode)
When the system is powered on, the panel automatically enters Priming mode to allow pump priming. The display shows code M019.
WARNING: Do not use the hot tub during the priming phase.
2.1 Duration and Operation
Priming mode lasts approximately 4-5 minutes. During this phase, the system verifies that all pumps are properly primed.
- The display shows "Pr" or M019
- Pumps activate automatically in sequence
- Visually verify that water flows from the jets
- If necessary, press JETS to manually activate the pumps
- Upon completion, the system switches to normal operating mode
NOTE: If the pumps do not prime within 4-5 minutes, check the water level and ensure there is no air in the system.
3 Time Setting
Set the correct time for proper operation of scheduled filtration cycles.
3.1 Procedure
- Press MENU to access the main menu
- Navigate with WARM/COOL to TIME
- Press MENU to select
- Use WARM/COOL to set the hours
- Press MENU to move to minutes
- Use WARM/COOL to set the minutes
- Press MENU to confirm and exit
NOTE: The time format (12h or 24h) can be changed in the Preferences menu.
4 Temperature Range Setting
The system offers two selectable temperature ranges to adapt to different usage needs.
| Range | Minimum | Maximum | Usage |
|---|---|---|---|
| High Range (Hi) | 26.7°C (80°F) | 40°C (104°F) | Normal use |
| Low Range (Lo) | 10°C (50°F) | 37.2°C (99°F) | Energy saving |
4.1 Temperature Adjustment
- Press WARM to increase temperature
- Press COOL to decrease temperature
- The display shows the SET icon during adjustment
- After a few seconds, the display returns to the current temperature
4.2 Range Change
- Press MENU and navigate to TEMP
- Press MENU to access settings
- Select HIGH or LOW
- Press MENU to confirm
5 Modes (Ready/Rest)
The system offers two operating modes that determine water heating management.
5.1 Ready Mode
In Ready mode, the system constantly maintains water temperature at the set value.
- Icon B (Ready) illuminated on display
- Constant temperature 24 hours a day
- Hot tub always ready to use
- Higher energy consumption
5.2 Rest Mode
In Rest mode, heating occurs only during scheduled filtration cycles.
- Icon C (Rest) illuminated on display
- Heating only during filtration
- Lower energy consumption
- Temperature may vary between cycles
5.3 Mode Change
- Press MENU to access the main menu
- Navigate with WARM/COOL to MODE
- Press MENU to select
- Choose READY or REST
- Press MENU to confirm
6 Filtration Settings (FLTR1 and FLTR2)
The system allows programming up to two daily filtration cycles to keep the water clean.
6.1 Cycle 1 Programming (FLTR1)
- Press MENU and navigate to FLTR
- Press MENU to access
- Select F1 START to set the start time
- Use WARM/COOL to adjust the time
- Press MENU to confirm
- Select F1 DUR to set the duration
- Use WARM/COOL to adjust (15-minute increments)
- Press MENU to save
6.2 Cycle 2 Programming (FLTR2)
- After setting FLTR1, navigate to F2 START
- Set second cycle start time
- Navigate to F2 DUR
- Set the second cycle duration
- Press MENU to save and exit
NOTE: The minimum recommended duration for each cycle is 2 hours. Increments are 15 minutes.
7 Panel Lock and Unlock
The lock function prevents accidental changes to settings.
7.1 Activating Lock
- Press MENU and navigate to LOCK
- Press MENU to access
- Select FULL (complete lock) or PARTIAL (partial lock)
- Press MENU to activate
7.2 Deactivating Lock
- Press and hold MENU for 5 seconds
- Navigate to LOCK
- Select OFF
- Press MENU to confirm
NOTE: With PARTIAL lock, you can still turn pumps and lights on/off.
8 Flip Display
The FLIP function allows rotating the display 180° for installations where the panel is mounted upside down.
8.1 Procedure
- Press MENU to access the main menu
- Navigate with WARM/COOL to FLIP
- Press MENU to activate rotation
- The display rotates immediately by 180°
NOTE: Press again to return to the original orientation.
9 Preferences
The preferences menu allows customizing various system settings.
9.1 Accessing Preferences
- Press MENU and navigate to PREF
- Press MENU to access
- Use WARM/COOL to navigate between options
- Press MENU to modify the selected option
9.2 Available Options
| Preference | Options | Description |
|---|---|---|
| F/C | °F / °C | Temperature unit of measurement |
| 12/24 | 12h / 24h | Time display format |
| RMDR | On / Off | Maintenance reminders |
| CLNUP | On / Off | Automatic cleanup cycle |
9.3 Temperature Unit (F/C)
Select Fahrenheit (°F) or Celsius (°C) for temperature display.
9.4 Time Format (12/24h)
Choose 12-hour format (with AM/PM) or 24-hour format for time display.
9.5 Reminders (RMDR)
When activated, reminders alert you to the need for regular maintenance (pH check, filter cleaning, water change).
9.6 Cleanup
The Cleanup function activates a brief automatic pump cleaning cycle after each use to prevent water stagnation in the pipes.
10 Error Messages and Diagnostics
This section describes all error messages that may appear on the TP500 panel display, with detailed explanations from the official Balboa manual and step-by-step troubleshooting instructions.
10.1 General Status Messages
10.1.1 RUN PMPS PURG AIR - Priming Mode (M019)
This message appears every time the system is powered. Priming mode allows you to manually run each pump to verify they are primed (air has been eliminated) and water is flowing correctly.
Priming mode characteristics:
- Duration: 4-5 minutes
- The heater is disabled during this phase for safety
- No devices activate automatically
- Pumps can be manually activated by pressing the JETS buttons
What to do:
- When the message appears, press the JETS button once to start Pump 1 at low speed
- Press again to switch to high speed
- If a second pump is present, press AUX to activate it
- Observe that water flows from the jets in the tub
- If pumps do not deliver water after 2 minutes, turn them off and repeat the process
WARNING: Do not run a pump without water for more than 2 minutes. Repeat the priming attempt maximum 5 times. If pumps do not prime, turn off the system and contact service.
To manually exit Priming mode, press a temperature button (WARM or COOL).
10.1.2 ---°F / ---°C - Unknown Temperature
The display shows dashes instead of temperature when the system has not yet detected the water temperature.
What to do:
- Wait for the pump to run for at least 1 minute
- The system requires water moving through the heater to measure temperature
- After about 1 minute of pump operation, the temperature will be displayed
10.1.3 TOO COLD - Freeze Protection
The temperature sensors in the heater have detected a potential freezing condition. Pumps and blower activate automatically to protect the system.
System behavior:
- All pumps and blower activate automatically
- They remain active for at least 4 minutes after the freeze condition has ceased
- Pumps may run continuously or intermittently depending on conditions
- The heater may activate during freeze protection
What to do:
- No action required: the system manages protection automatically
- Ensure the thermal cover is properly positioned
- Never disconnect power during freezing conditions
WARNING: In cold climates, if the GFCI/RCD trips, it must be reset immediately to avoid freeze damage to the hot tub.
10.1.4 WATR TOO HOT - Water Too Hot (OHS - M029)
DANGER: One of the temperature sensors has detected that water has reached 43.3°C (110°F). All spa functions are disabled.
System behavior:
- The system resets automatically when temperature drops below 42.2°C (108°F)
- You can manually reset by pressing any button
What to do:
- Do not enter the water under any circumstances
- Remove the thermal cover to promote cooling
- Check if there was prolonged pump operation
- Check if ambient temperature is particularly high
- Wait for temperature to drop below 42°C
10.1.5 SFTY TRIP - Safety Trip (M033)
The system has detected closure of the vacuum switch. This indicates a potential suction problem or an avoided entrapment situation.
WARNING: Not all systems have this safety feature.
What to do:
- Do not enter the water
- Check that suction grates are not obstructed
- Check that no objects are blocked near the suctions
- Contact service if the problem persists
10.2 Heater-Related Messages
10.2.1 HTR FLOW FAIL - Reduced Heater Flow (HFL - M016)
There may not be enough water flow through the heater to dissipate heat from the heating element. The system will attempt to restart the heater after approximately 1 minute.
What to do - Flow checks:
- Check the water level in the tub
- Check for flow restrictions at suctions
- Check that all valves are open
- Check that no air is trapped in the system
- Check that not too many jets are closed
- Check that the pump is properly primed
10.2.2 HTR FLOW FAIL (LF - M017) - Confirmed Insufficient Flow
Water flow through the heater is insufficient to dissipate heat. The heater has been disabled.
What to do:
- Perform all flow checks described above
- After resolving the problem, press any button to reset and restart the heater
10.2.3 HTR MAY BE DRY - WAIT (dr - M028)
WARNING: Possible dry heater, or there is not enough water in the heater to start it. The system shuts down for 15 minutes.
What to do:
- Wait for the 15-minute automatic pause
- Meanwhile, perform flow checks
- Press any button to reset and restart
10.2.4 HTR DRY - Dry Heater (M027)
DANGER: There is not enough water in the heater to start it. The system has shut down completely.
What to do:
- Immediately check the water level in the tub
- If the level is low, fill to the correct level
- Perform all flow checks
- After resolving the problem, press any button to reset and restart
10.2.5 HTR TOO HOT - Heater Overheated (OHH - M030)
DANGER: One of the sensors has detected a temperature of 47.8°C (118°F) in the heater. The system has shut down completely.
What to do:
- Do not touch the system
- Wait for temperature to drop below 42.2°C (108°F)
- Perform flow checks to identify the cause
- Press any button to reset when temperature has dropped
NOTE: Even when the system is off, some devices may occasionally activate to monitor temperature or if freeze protection is needed.
10.2.6 PRES BTTN TO RSET - Press to Reset
This message may appear along with other error messages. It indicates that a button must be pressed to acknowledge the error and reset the system.
NOTE: Some errors may require disconnecting and reconnecting the power supply.
10.3 Sensor-Related Messages
10.3.1 SNSR BAL-ANCE - Poor Sensor Balance (M015)
Temperature sensors may be out of sync by 2-3°F (1-1.5°C). This could be a temporary problem.
What to do:
- Activate the jets for a few minutes to equalize water temperature
- If the message persists, contact service
10.3.2 SNSR SYNC - CALL FOR SRVC - Sensor Synchronization (M026)
Temperature sensors are out of sync. The problem has persisted for at least 1 hour.
What to do:
- Contact technical service for sensor verification and calibration
10.3.3 SNSR A/B - CALL FOR SRVC - Sensor Failure (A: M031, B: M032)
A temperature sensor or its circuit is faulty.
What to do:
- Contact technical service immediately
- The sensor will need to be replaced
10.4 System Messages
10.4.1 NO COMM - No Communication
The control panel is not receiving communication from the central system.
What to do:
- Check that the panel cable is properly connected
- Check for visible damage to cables
- Contact technical service
10.4.2 MEM FAIL - Memory Error (Checksum - M022)
At startup, the system did not pass the program checksum test. There is a firmware problem.
What to do:
- Contact technical service - firmware intervention is required
10.4.3 MEM RSET - Persistent Memory Reset (M021)
Appears after any modification to the system configuration.
What to do:
- If it appears only once after a modification, it is normal
- If it appears repeatedly or after the system has been operating normally, contact service
10.4.4 CLOK FAIL - Clock Error (M020)
Error in the system clock memory.
What to do:
- Contact the dealer or technical service
10.4.5 CNFG FAIL - Configuration Error
System configuration error. The spa will not start.
What to do:
- Contact the dealer or technical service
10.4.6 GFCI FAIL - GFCI Test Failed (M036)
ELECTRICAL HAZARD: The system was unable to test/trip the GFCI device. This could indicate an unsafe installation (available only on North America/UL systems).
What to do:
- Do not use the hot tub
- Do not touch the water
- Contact the dealer or a qualified electrician immediately
10.4.7 STUK PUMP - Pump Stuck ON (M034)
DANGER: A pump appears to be stuck in the ON position.
What to do:
- IMMEDIATELY turn off the hot tub from the electrical panel
- DO NOT ENTER THE WATER - water may be overheated
- Contact technical service
10.4.8 HOT FALT - CALL FOR SRVC - Heat Fault (M035)
DANGER: A pump appears to have been stuck in the ON position when the spa was last powered.
What to do:
- IMMEDIATELY turn off the hot tub from the electrical panel
- DO NOT ENTER THE WATER
- Contact technical service
10.4.9 BETA VER-SION - Beta Version
The system is running pre-production (test) software.
What to do:
- Contact service for firmware update
10.5 Maintenance Reminder Messages
These messages appear automatically according to a regular schedule when the Reminder (RMDR) function is active. They alternate with normal temperature display. Press a temperature button to reset a displayed reminder.
| Message | Frequency | What to Do |
|---|---|---|
| CHEK PH | Every 7 days | Check pH with a test kit and adjust with appropriate chemicals. Ideal value: 7.2-7.6. |
| CHEK CHEM | Every 7 days | Check sanitizer level and other chemical parameters with a test kit and adjust if necessary. |
| CLN FLTR | Every 30 days | Clean the filter cartridge according to manufacturer instructions. Use HOLD mode during cleaning. |
| TEST GFCI | Every 30 days | Test the GFCI/RCD device using the TEST and RESET buttons on the switch. |
| CHNG WATR | Every 90 days | Change the hot tub water to maintain proper chemical balance and hygienic conditions. |
| CLN COVR | Every 180 days | Clean and treat the vinyl cover to maximize its lifespan. |
| TRT WOOD | Every 180 days | Clean and treat any wood finishes according to manufacturer instructions. |
| CHNG FLTR | Every 365 days | Replace the filter cartridge to maintain proper operation and hygienic conditions. |
| CHNG CART | When needed | Install a new mineral cartridge (if present). |
| CHEK OZ | Every 365 days | Check the ozone and/or UV generator according to manufacturer instructions. |
| SRVC CHEK | Every 365 days | Have a complete hot tub inspection performed by a qualified technician. |
WARNING: If freezing conditions exist, a GFCI/RCD should be reset immediately after tripping, otherwise damage to the spa may occur. The end user should always be instructed to regularly test and reset the GFCI/RCD.